How to Use Gaggia Classic: Espresso, Milk & Descale

The Gaggia Classic is the machine a lot of home baristas start with — and the machine a lot of them keep. It is a single-boiler, manual espresso machine with a real 58 mm commercial portafilter, a 3-way solenoid valve, and almost nothing between you and the shot. That is the appeal and the catch: it will not hold your hand, so you need to know the steps — which is what this guide on how to use Gaggia Classic is for.
Short answer on how to use Gaggia Classic: fill the tank, warm the machine up with the portafilter locked in, dose 18 g into the double basket, tamp level, pull a 25–30 second shot, then switch to steam mode for milk. Prime it before first use, purge the steam wand every time, and descale about every two months with Gaggia descaler — never vinegar. The rest of this guide walks through each step, including the temperature-surfing trick that makes the Classic’s shots consistent.
One honest note before the detail: we have not tested this machine ourselves. This guide on how to use Gaggia Classic is built from Gaggia’s own manuals and product pages, retailer specifications, and established how-to guides, all checked on 20 November 2026. Where models differ, the guide says so — because “Gaggia Classic” now covers four machines.
Which Gaggia Classic Is This?
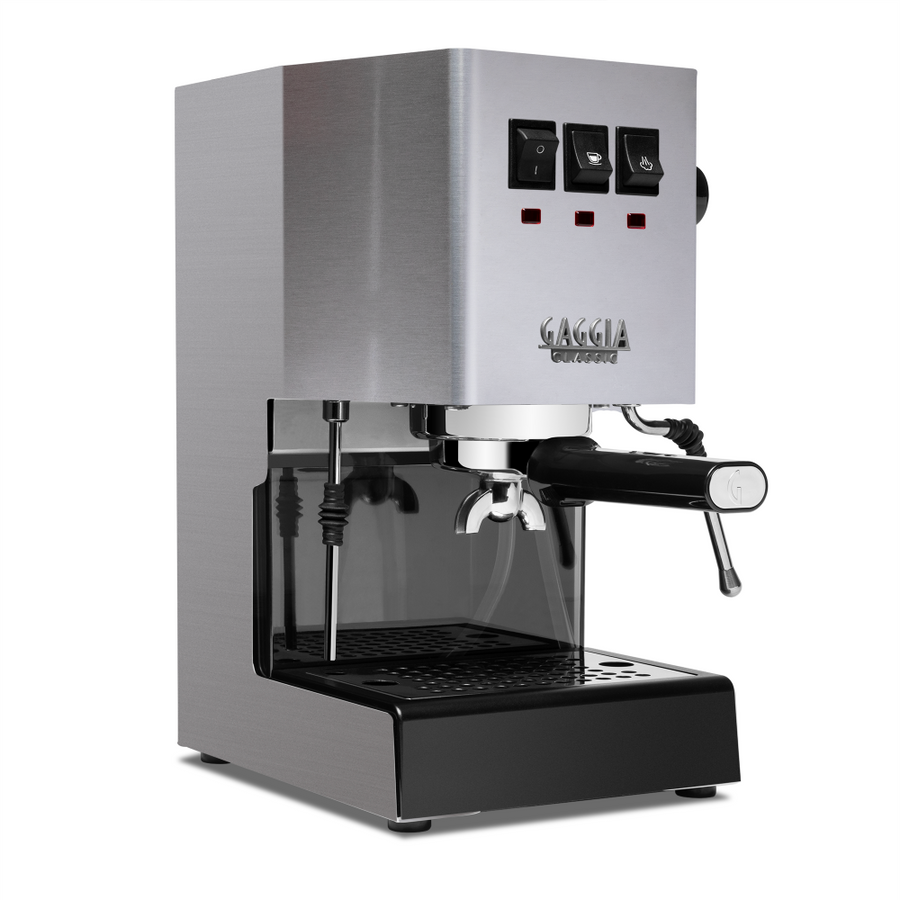
“Gaggia Classic” is a family, not one machine. The steps below on how to use Gaggia Classic are written for the classic three-switch machine — the Classic Pro (2019), the Evo Pro (2023), and the E24 — which is the machine most owners have. The new Classic UP is noted where it differs.
| Model | What is different | Who has it |
|---|---|---|
| Classic Pro (2019) | The reboot of the original: 58 mm chrome-plated brass portafilter, 15-bar pump, 12-bar OPV, aluminum boiler, rocker switches, ready lights | Most used Classics for sale today |
| Classic Evo Pro (2023) | 9-bar OPV (North American version), stainless steel portafilter and group cover, same single boiler and 3-way solenoid | The current standard Pro |
| Classic E24 | Current North American revision; manual descaling procedure in its booklet, Gaggia descaler only | New US/Canada sales |
| Classic UP (new) | Adds a 2-inch TFT display, two PIDs (brew + steam), adjustable pre-infusion, analog brew gauge, 9-bar brewing / 15-bar nominal pump | New buyers from 2025–2026 |
Two things are true of every Classic except the UP: there is no built-in grinder and no thermometer or temperature display. You need a separate grinder, and you judge temperature by the ready lights — which is exactly what the temperature-surfing section below is for. If you are buying new and want the machine to show its temperature, that is the UP, not the Pro.
What You Need Before the First Shot
- A grinder that can grind fine enough for espresso. This is not optional. The Classic has no built-in grinder, and pre-ground supermarket coffee will run too fast and taste sour. A burr grinder is the single most important companion purchase — see our best coffee grinders guide.
- Fresh beans, roasted within the last few weeks. See how to choose fresh coffee beans.
- A tamper. A plastic one comes in the box; a 58 mm metal tamper is a cheap upgrade that makes tamping far more consistent.
- A small scale. Dosing by weight (18 g in, about 36 g out) is how you repeat a good shot.
- Whole milk, cold, for steaming. Gaggia recommends whole cold milk at about 5 °C / 41 °F, with protein at least 3% and fat at least 3.5%.
- Filtered or bottled water. Hard water scales the boiler faster; soft water means less descaling.
If you are new to espresso entirely, read our espresso guide first — it covers the dose, ratio, and timing basics this guide on how to use Gaggia Classic builds on.
First Use: How to Prime a Gaggia Classic
Priming fills the empty boiler with water, and it is the first step in how to use Gaggia Classic. Do this before the very first use, and again after the machine has sat unused for a long time.
- Fill the tank with fresh cold water to the MAX line and slide it back in.
- Place a cup or your milk pitcher under the steam wand. The wand swings out.
- Open the steam valve all the way counter-clockwise. Be gentle — fingertip tight only when you close it later.
- Turn on the power switch (far left), then the steam switch (middle), then the brew/pump switch (far right). The pump will buzz loudly. Water should start coming out of the wand.
- Turn off the brew switch, then the steam switch, then close the steam valve.
- Place a cup on the drip tray and turn on the brew switch. Water should flow from the group head. Let a full cup run through, then switch it off.
The boiler is now full. If the pump runs but no water comes out anywhere, switch everything off and repeat — an airlocked boiler is common on first use and priming again fixes it.
How to Pull a Shot on a Gaggia Classic
Warm-up matters more than anything else when you learn how to use Gaggia Classic. A cold portafilter and a cold group will steal heat from your shot.
Step 1: Warm up (5–10 minutes)
Turn the machine on with the portafilter locked into the group and a cup underneath. Wait until the brew-ready light comes on, then give it a few more minutes. Run a blank shot (no coffee) through the group to heat the portafilter and cup.
Step 2: Dose and grind
Dose 18 g of freshly ground coffee into the double basket. Grind fine — like table salt or slightly finer. If you are using the pressurized (dual-wall) basket that comes in the box, a slightly coarser grind works; the unpressurized basket needs a proper espresso grind.
Step 3: Distribute and tamp
Level the grounds with your finger or a distributor, then tamp straight down with firm, even pressure. The puck surface should be flat and level. Wipe grounds off the rim so the portafilter seals cleanly.
Step 4: Temperature surf (the Classic’s trick)
The Classic has no PID, so the boiler temperature swings up and down around the ready light. For a consistent shot, use the light: wait for the brew-ready light to come on, then start your shot about 30 seconds after the light comes on and the boiler switches off — that timing gives a cooler, more repeatable brew temperature. This is called temperature surfing, and it is the single best-known trick for anyone learning how to use Gaggia Classic.
(If you own the Classic UP, skip this — set the temperature on the display instead.) Roasty Coffee’s step-by-step Gaggia guide teaches the same warm-up and shot routine.
Step 5: Pull the shot
Lock the portafilter in firmly, place your cup and scale underneath, and flip the brew switch. A good double shot runs 25–30 seconds and yields about 36 g of espresso (a 1:2 ratio). Watch the flow: it should start as slow drips after a few seconds, then run like warm honey. If it gushes out in 15 seconds, grind finer. If it chokes and barely drips, grind coarser. Mind your coffee-to-water ratio — ratio affects the cup more than the machine does.
Step 6: Stop and clean up
Flip the brew switch off at your target weight. The 3-way solenoid valve will release the pressure — you will hear a hiss into the drip tray — and the puck will come out dry. Knock it out, wipe the basket, and run a short blank shot to rinse the group.
How to Steam Milk on a Gaggia Classic
The Classic’s commercial-style steam wand is one of its best features — it can make real microfoam once you learn how to use Gaggia Classic. The catch is the single boiler: you steam after brewing, not during.
- Finish your shot first, then flip the steam switch on and wait for the steam-ready light.
- Purge the wand. Open the steam valve for a few seconds into the drip tray to blow out condensed water. Close it.
- Fill your pitcher about one-third full with cold whole milk.
- Submerge the tip just below the surface and open the valve. You want a gentle tearing sound at first — that is air going in (stretching). Keep the tip near the surface until the milk has grown by about a third.
- Lower the tip slightly and tilt the pitcher to get the milk spinning in a whirlpool. That folds the bubbles in (texturing). Stop when the pitcher feels hot to the touch — about 60–65 °C.
- Close the valve, wipe the wand immediately with a damp cloth, and purge again for a second so milk does not bake inside.
- Bring the boiler back down. Flip the brew switch and run water through the group until the steam light goes out and the brew light comes back on. If you skip this, your next shot will be over-hot and bitter.
If your milk is more bubble bath than silk, you stretched too long or kept the tip too deep. Less air, more whirlpool — and cold milk in a cold pitcher helps.
Hot Water and Americanos
The Classic dispenses hot water through the steam wand: flip the steam switch on, wait for the light, put a cup under the wand, and open the valve. For an Americano, pull a double shot first, then add hot water to taste — our Americano guide covers ratios. Remember the boiler runs hotter in steam mode, so let it come back down before your next shot — a small but important part of how to use Gaggia Classic.
Daily Cleanup (2 Minutes)
- After every shot: knock out the puck, wipe the basket, run a blank shot through the group.
- After every steaming: wipe and purge the wand immediately.
- End of the day: empty and rinse the drip tray, wipe the group gasket area, and leave the portafilter out or loosely locked so the gasket can dry.
- Weekly: backflush with plain water using a blind filter (the UP ships with one; for the Pro/Evo Pro, a 58 mm blind filter is a cheap buy). Lock it in, run the pump for 10 seconds, stop for 10 seconds, repeat five times. This flushes coffee oils out of the solenoid valve.
How to Descale a Gaggia Classic
Part of how to use Gaggia Classic is descaling about every two months — more often with hard water. Scale buildup is not covered by the warranty, so this is the maintenance that actually matters.
Use Gaggia descaler only. Never use vinegar — it can damage seals and internal parts, and Gaggia’s own manuals warn against it. The procedure below is the Pro/Evo/E24 manual procedure. If you own the Classic UP, Gaggia’s support page says to contact an authorized service center for descaling instead — check your booklet first. A detailed walkthrough of the same manual procedure is in HomeBaristaMods’ descaling guide.
- Remove the portafilter and empty the water tank.
- Add half a bottle of Gaggia descaling solution, then fill the tank with fresh water to the MAX line.
- Turn the machine on. Dispense about two 150 ml cups through the steam wand, then about two 150 ml cups through the brew unit.
- Turn the machine off and let the solution sit for about 20 minutes.
- Turn it on again and repeat the same steam-wand and brew-unit dispensing, then turn it off for about 3 minutes.
- Repeat until the tank is empty. Do not drink anything that comes out during descaling.
- Rinse thoroughly. Rinse the tank, refill with fresh drinking water, and run full tanks through the steam wand and brew unit — the E24 manual calls for four tanks of rinse water in total. The rinse matters as much as the descale: leftover descaler ruins the next dozen shots.
If water flow is slow even after descaling, remove the shower screen and clean it — grounds and scale collect behind it.
Troubleshooting: Common Gaggia Classic Problems
| Problem | Likely cause | Fix |
|---|---|---|
| Shot runs too fast, tastes sour | Grind too coarse, or dose too low | Grind finer; dose a full 18 g |
| Shot chokes, barely drips | Grind too fine | Grind coarser; try the pressurized basket |
| Shot tastes bitter and burnt | Water too hot, or boiler left in steam mode | Temperature surf; always cool the boiler down after steaming |
| No water from the group | Airlocked boiler, or empty tank | Re-prime the machine; check the tank is seated |
| Weak, thin steam | Boiler not at steam temperature yet | Wait for the steam-ready light; purge the wand first |
| Water leaking around the portafilter | Worn group gasket, or grounds on the rim | Wipe the rim; replace the gasket (a common wear part) |
| Pump runs but nothing comes out | Scale buildup, or a clogged solenoid | Descale; backflush with water |
| Espresso tastes flat after months of good shots | Grinder burrs dull, or beans stale | Fresh beans first; check grinder |
Is the Gaggia Classic Still Worth It in 2026?
At a US list price of about $499 (Whole Latte Love, November 2026), the Evo Pro is still the cheapest way into a real 58 mm portafilter, a 3-way solenoid, and a machine you can repair and modify for years — which is why this guide on how to use Gaggia Classic still matters in 2026.
Nothing else at this price gives you the same parts availability or community knowledge. What it does not give you is convenience: no grinder, no PID, no temperature display, and a single boiler that makes you wait between brewing and steaming. If you want the machine to guide you, our Philips Barista Brew review covers a guided beginner machine in the same price range — but if you want to learn espresso properly, the Classic is still the teacher.
Frequently Asked Questions
Do I need a separate grinder for the Gaggia Classic?
Yes. No Classic has a built-in grinder. A burr grinder that can grind fine enough for espresso is required — pre-ground coffee runs too fast and tastes sour. See our best coffee grinders guide.
How long does a Gaggia Classic take to warm up?
About 5–10 minutes with the portafilter locked in. Wait for the brew-ready light, then run a blank shot to heat the group and cup. The boiler itself heats in a few minutes; the metal around it takes longer.
Why is my Gaggia Classic espresso sour?
Almost always the grind is too coarse or the shot ran too fast, so the coffee is under-extracted. Grind finer, dose a full 18 g, and aim for 25–30 seconds. A cold machine also causes sour shots — warm it up fully first.
Can I use pre-ground coffee in a Gaggia Classic?
Yes, with the pressurized (dual-wall) basket that comes in the box — it is designed for pre-ground coffee. For the standard unpressurized basket, you need freshly ground beans at espresso fineness.
How often should I descale a Gaggia Classic?
About every two months, or sooner with hard water or if flow slows down. Use Gaggia descaler only — never vinegar.
Does the Gaggia Classic have a PID or a thermometer?
No — not the Classic Pro, Evo Pro, or E24. They have brew-ready and steam-ready lights only, which is why temperature surfing matters when you learn how to use Gaggia Classic. The new Classic UP is the exception: it has two PIDs and a TFT display that shows the temperature.